2015-07-31

Refashion Month with Sew Thrifty


So sorry for the late posting today, we have been having some technical problems to post this, but here it is, and quickly we  have reached the last day of the month, the last day of this year's series too. To finish this roll of great inspiration bloggers I have the perfect guest for the job, Dana, from Sew Thrifty. Just a few days ago, I had the pleasure to be part of her series on how to save while sewing and I loved that so much, because you know, that's what I am always trying to do. Check out her blog for a lot of upcycling ideas. 

***

Hello, my name is Dana, and I sew and save over at Sew Thrifty. I've just finished off a month of amazing thrifty sewing tips and refashioning is one of many routes I take to save money while sewing. Today I'm excited to share the first look at a wedding outfit I refashioned for my son!


My brother's wedding was just over 2 weeks ago and I knew for several months that I wanted to sew all the outfits for my family for the event. And, why not upcycle and use free patterns for everything too, right? Well, I was able to accomplish most of that. The pattern for my dress was free, the fabric for my daughter's dress and headband were free, and I found a dress that worked perfectly for my baby so I didn't have to sew anything for her. But today, I'm focusing on my boy. We don't get dressed up much at all, so this wedding was the perfect excuse for me to go crazy sewing something fancy for him. My son's outfit turned out to be the best use of free patterns and upcycled materials, so that's the one I wanted to showcase for you today.

  Thrifty Handmade Wedding, a refashion by Sew Thrifty 

The original shirt was my husband's favorite shirt, but the collar was coming apart and just wasn't ok for him to wear to work anymore. He hated to give it up, so I snuck it away years ago in hopes of using it for a refashion one day. And today is the day! For the vest, I thrifted a pair of dress pants. The original intent was to find a jacket, but the pattern I used didn't fit the jackets I found, so I decided on pants. And, I found these for 50% off - only $2! I tried to keep the original welted pockets, but they were slightly too big, so I had to sew my own. 
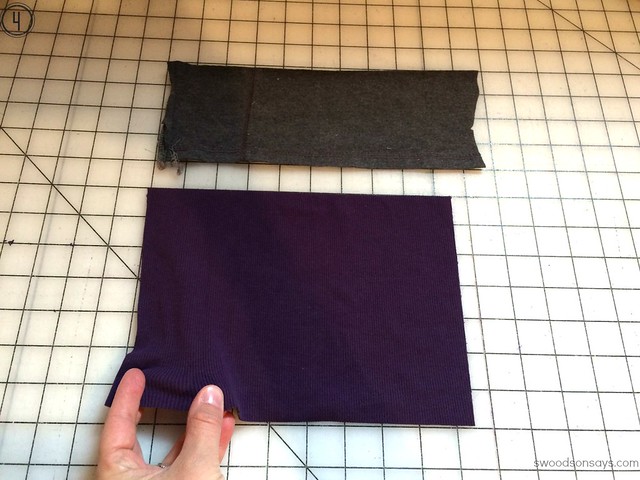
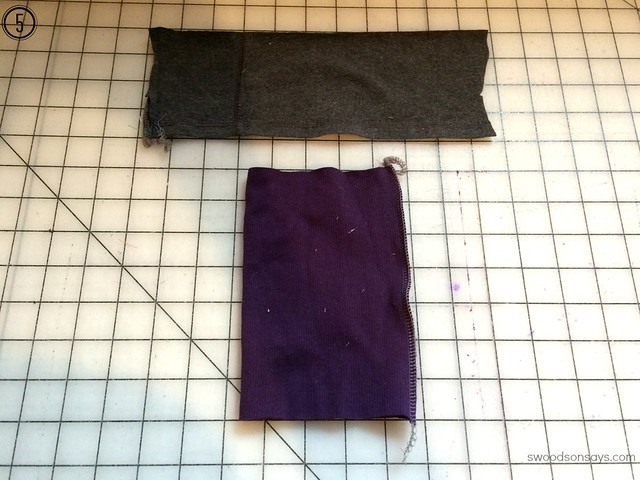
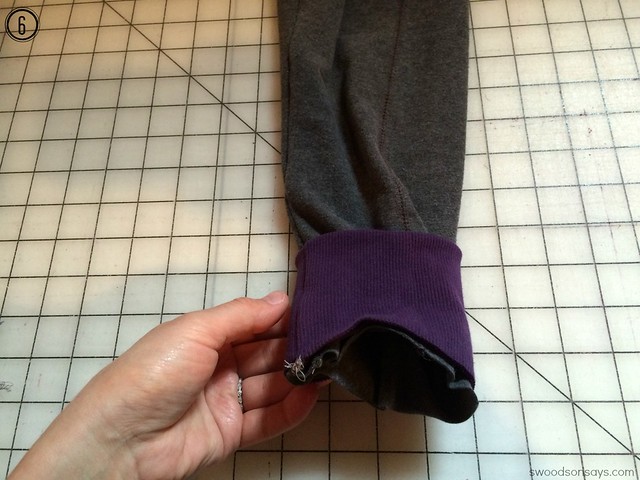
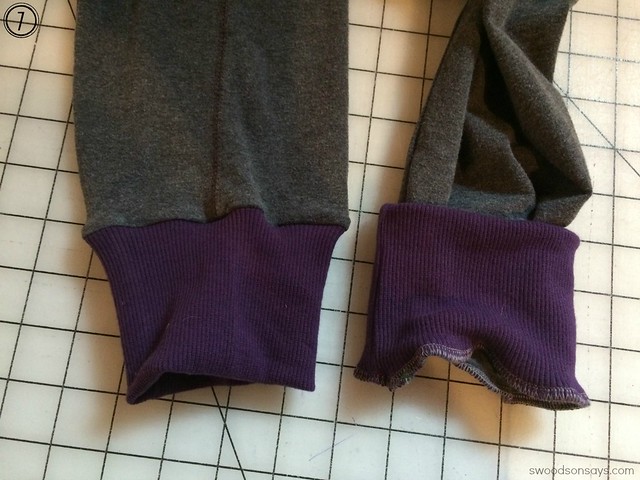
You can see here how the cuffs from the original shirt were used for my son's shirt. I loved that I didn't have to sew all that. And the buttons were reused as well! I did have to improvise on the collar, since I couldn't re-use that section and I was running out of fabric. Luckily I had some spare white cotton that I used to line the inside of the collar, since that section wouldn't really get seen anyway and the outside of the collar came from the back of the original shirt. 

Thrifty Handmade Wedding, a refashion by Sew Thrifty
{Do-da-doo! Here comes the bride!}

The vest came together nicely, even though I wasn't able to use any of the original pockets from the pants. I lined it with a khaki cotton someone had given me from their stash. Then I accented it with orange buttons. Yes, I went with orange

{ok, Mama, enough with all this wedding stuff, where's the cake?!}


The tie was made from a free pattern as well, along with scraps of fabric that was given to me. And his pants and shoes were given to me by a friend. His whole outfit came to a whopping $5, since I include the price of thread, buttons, and the clasp for the tie. Not too bad for a fancy wedding outfit. I might be able to afford to dress him up more often.

If you're interested in learning more about the rest of my thrifty wedding outfits, come on over to my blog next week. The last-minute flower girl dress has a story so great I can't wait to share it!

Thanks so much Magda for having me as a part of your amazing refashion month!

line up_correct2

2015-07-30

Refashion Month with Just Another Project


Kelly from Just Another Project, is my guest blogger today. Her blog is the last new to me blog for the series. It was nice to discover what she writes about, which is a bit of everything, things she does with her kids, sewing, food, just random stuff from her daily life, and I also discovered her fun Kelly Designs pattern shop. Kelly has refahioned a complete outfit for herself. Sometimes I am told, it is easy for me to refashion because I do it for my kids, or myself (I'm small), and here she proves that adults can refashion a smaller piece into a bigger one too, just using a bit of creativity. 


Hi! I'm Kelly from Just Another Project, where I blog about much anything.  I'm excited to join in Refashion Month!  I discovered the joy of refashioning last fall when I was making my self some maternity shirts, and have mostly just upcycled some of my husband's shirts into clothes for my boys.  This spring, my husband and I did a much-needed purging of our wardrobes. I've been having fun going through the cast-offs and repurposing them, mostly downsizing t-shirts to fit my sons. I decided to make myself an upcycled outfit and this is what I came up with.   I started with my old denim skirt and a t-shirt of my husband's.
This skirt was a favorite of mine in high school and college.


I bought it over 15 years ago it has seen a lot of wear. However, after a 9.5 pound Baby Boy #2 it no longer fits around my hips.  I really am kind of clueless about current fashion trends but I doubt this skirt is currently in style. So, after accepting the fact I was never going to fit into it again (I'll be honest, that took a couple weeks), I took some scissors to it.
This was a fairly simple refashion.  I could have kept it long, but decided to go for a different look.  First I cut off some length.

Then I cut the front and back apart at the side seams.

After do some measuring and calculating I drafted the triangular piece that I inserted in the sides. I added to the top to form a waist band and the bottom for the hem. The panel that I inserted I the sides is a layer of lace backed with some unbleached muslin, both from large scraps in my stash.

I sewed in the panels between the front and back of the skirt, folded over the top to match the waist band, and hemmed the bottom.


I had originally planned on putting lace around the bottom, but I am not an overly feminine person, and my husband and I agreed that that would just be way too much lace for me.  
The shirt started as one of my husband's t-shirts that had shrunk after going through the wash. 


To make the shirt I used the Laced Ladies Top pattern from Koerb Brothers Stitch Designs. I easily fit a size small on the men's medium t-shirt. The lace was not an upcycle; I purchased it from Hancock Fabric for this project.

I made coordinating headband with some fabric scraps and fold over elastic from this skirt, and of course added boots.  My son thought I needed a flower for my photo shoot.

A big thanks to Magda for putting together Refashion Month!  I've had fun seeing everyone's refashions and I hope you have too!


2015-07-29

Refashion Month with me - late again

Scroll down for english, please!


Já não falta muito para o fim do dia, outra vez. Quase que deixo passar o meu dia de publicar, mas ainda vou a tempo.  Hoje serei breve. Não há muito a dizer. Fiz mais um par de calças da Ottobre, com o mesmo molde que usei na primeira semana da série. Usei um par de calças de fato treino de mulher, e retalhos de uma malha preta, fininha que havia por aqui. 

It's not much left to the end of the day, again. I almost let my own posting day go by, but I am still on time here. Today I won't be long. There's not much to say. I made another pair of the Ottobre pants pattern I did in the first week of the series. I used a women's sportpants, and scraps of a thin black knit I had around. 


Este par acabou por ficar melhor. Aparentemente a Ottobre não traz margem de costura mas na cintura traz sim, as anteriores ficaram com um gancho muito comprido, mas estas ficaram perfeitas. 

This pair ended up better than the first one. Apparently, Ottobre has no seam allowances but it does have it on the waist band, the pants I made before, had a way too big crotch, but those were just perfect. 


Julho está quase a acabar, e com ele o Refashion Month. Ainda temos mais duas convidadas para partilharem as suas publicações, por isso não se esqueçam de cá voltar. 

July is almost over, and so is the Refashion Month. We still have two guests sharing their posts, so make sure you'll be around. 

2015-07-28

Refashion Month... Without


I was having Amy from Friends Stitched Together sharing her refashion ways with us today. Unfortunately, as we all know, sometimes life just gets in the middle and things don't go as we expect them to. So, no Amy here today, which doesn't mean you can't visit her (and Tasha's) blog and check out their previous refashions. I'll be back tomorrow with a refashion of my own... hopefully. 

line up_correct2


2015-07-27

Refashion Month with Knot So Normal


Today I am welcoming Jonie from Knot So Normal, in the series for the first time. We've been taking part in a few tours, and apart from loving refashioning, she also does crochet and anything she's tempted too, my kind of peson then. I actually relate to her in a lot of ways, not only in sewing, we both have a girl and a boy, we sew, upcycle, do crafts with our kids (letting them use their imagination), and more. I love her project for today, and I hope you too. 

***

Hi everyone! I am so excited to be here sharing my refashion with you. Refashion and upcyclying are 2 of my favorite parts of sewing. When I started sewing money was really tight, so I dipped into our closets to make stuff. I am ALWAYS scanning clearance racks for items to turn into a one-of-a-kind clothing piece for myself or my kids. I will admit to being a bit stumped for what I wanted to make for this post, so I started browsing through my collection of clothes to be refashioned and I found this coat. I LOVED this coat when I bought it, but it didn't have the best shape so I knew I wanted to turn it into something else. 

image

Originally I was going to redesign it into a coat for myself, but I am working on the Wardrobe Capsule Challenge by Rebel and Malice and decided to make a jacket for Miss G. After consulting with her she told me she wanted it to be short, warm and have a Halloween Hello Kitty Lining. She also requested one button on it. I think I rocked this one.

  refashion-001 

 The pattern for this is self-drafted with princess seams on the front and back bodice and a bottom band. I also added inseam pockets because every little girl needs pockets in her jacket. 

image 

I am happy to say that this jacket cost next to nothing. The coat was repurposed, the lining fabric was given to me by my aunt, the buttons were in a HUGE box of notions that I picked up at a yard sale for $3.00. I also added a layer of flannel between the main and lining fabric for extra warmth, it cost me next to nothing also. I picked it up at a yard sale for $.10 a few years ago. 

image 

 As Miss G is getting older I have been trying to up my sewing game and really make things that she is going to LOVE to wear to school and I think that this jacket totally fits the bill.


2015-07-24

Refashion Month with Swoodson Says


If I'm not wrong - though my memory isn't one to trust - I knew Stephanie from Swoodson Says, through this series, like a year ago. She runs the most amazing sewing and crafting fb group, not to mention her own blog, full of variety, what an inspiration. She embraced refashion as a way of living, just like myself, and that's one of the reasons why I specially like this lady here. Make sure to visit her blog today (link provided below) for the greatest tips for thrifting shopping. 

pant refashion

Hi! I'm so happy to be here; I just had my second kid 4 months ago and have a huge stack of clothes that I have big ideas for. Blog events give me a deadline and the motivation to make it happen! I'm sharing a bunch of tips and some "action shots" to help you shop more effectively when looking for clothes to upcycle or refashion over on my blog today if you want to read more. Jogger pants have been trendy lately; I made a pair of True Bias Hudson pants when I was pregnant and have been wearing them like crazy. I like a bootcut silhouette but I hate how the hems get wet, dirty, and dusty when I chase my toddler around! These grey pants are so comfy and have awesome big pockets but I find myself not wearing them because they get so filthy - so I decided to refashion them into slimmer, cuffed pants. It's a pretty easy fix and you can see how below, refashion a pair for yourself.

  refashion before 

 The before - comfy but not cutting it.

  refashioning tutorial 

 The after! Comfy, cozy joggers with a pop of purple (my favorite color!) 

  Step 1

step 1

Lay a pair of joggers that you like the fit of over top of your track pants. If you don't already own a pair, you can eyeball the curve, arching out from the crotch seam. Make sure both pairs of pants are laid completely flat, you can match the outseams but I didn't because both pants had stylistic curves. Use pins to follow along the new seam you'll be creating and sew a basting (long stitch length) stitch just outside your pinned line.

  step 2a 

Try them on! Make sure that there aren't any tucks, folds, and that you like the fit. Use a regular stretch stitch or a serger to make the new seam permanent and trim the excess off. 

Step 2

  step 2

Lay the excess piece on the other leg and pin outside of it, repeat with the basting, trying on, and finishing the seam.

  refashion skinny pants 

You could stop here if you like the look! I wanted to add a cuff, so keep reading. 

  Step 3

step 3

Sorry, feet shot, but use a pin and mark the desired length. Remember that you'll be adding length with your cuff. Cut off the excess length. 

Step 4

step 4

Lay the excess piece you just cut off the hems and cut the side seam so it's flat. You can use this to gauge the length of your cuff. When cutting your cuff, remember that the stretch needs to go from side to side, not up and down; ribbed knit is the best type of fabric to use. I cut my cuff about an inch shorter than the leg's opening. 

Step 5

step 5

Remembering which way the stretch needs to go, sew up the vertical side with a stretch stitch or a serger. Pull one edge up over itself so the wrong side of the seams are touching each other and all the edges match up. 

Step 6

step 6

Making sure your pants are right side out (not inside out), pull the cuff up so all raw edges are aligned. Sew with a stretch stitch or serger around them, gently stretching the ribbing to fit. 

Step 7

step 7

Repeat all steps to create another cuff and do the next leg. Ta-da! You're done.  

line up_correct2

2015-07-23

Refashion Month with HattieLu Handmade


Denita from HattieLu Handmade was a new to me blogger that joined the series. As I said before, I love that while  hosting this seriess allow me to get to know more blogs, more interesting and talented people from all over. She's the mom to three boys, she sews for them, and herself too. She runs a little shop with the cutest handbags, wallets, etc. Show her some love and visit her. For our series she refashioned for herself for the first time. How great is that?! Look at the cute pair she made. 

***

Hi House of Estrela readers! I'm Denita from HattieLu Handmade. I'm excited to show you my first women's refashion!
I'm new to the world of refashion and upcycle. The extent of my knowledge has been taking old t­shirts and making new shirts for my boys. Today, I'm stepping outside my comfort zone to refashion something new for me.
I didn't really know where to begin. Usually I hang onto clothes for an eternity because I think I'm going to wear them again. Eventually, the clothes make it to Goodwill. However, I'm in luck. There was a large box off to the side where I found three shift style dresses that haven't worn in at least five years.


Great, free material...but what to do with the material?? Mental block abound. Then it hit me! I love handbags and need something to carry small things. I've also started to wear more skirts and dresses. Eureka! I had my answer.
First things first! Which handbag pattern should I use? Swoon Coraline was the one!!! Coraline doesn't require a lot of fabric and allows for a little creativity. The accent fabric was a laundry failure that's been sitting on the shelf for a year. True story...didn't realize that denim fabric was in the wash load when washing the flower fabric. Oh well! Works perfectly for this project! 


I measured and marked the length needed to save for a tank top, then cut the remaining skirt portion off the dress. There was a seam on the back of the dress that I wanted to incorporate in my handbag.


Now back to the tank top portion. I have plenty of shirts so I needed to be more creative with the tank top idea. There were three dresses exactly the same except for color. The coral one above was the first, there was a turquoise one, and a lavender one. The turquoise seemed to be the best choice to use with the coral. The colors were contrasting, but complementary.


Surprise! The top and bottom are cut at an angle to give the dress more pop! The dress is hemmed at knee length. On the next refashion, I'll take in the bust darts a little more!
So what do you think? Simple, quick, and easy way to refashion a few old dresses! Not too bad for my first try!
Thank you House of Estrela for reviving up my creative juices and helping me to think outside the box.
line up_correct2

Labels

About us Acessories Adult Adults Advent Calendar Appliqué Baby Baby Acessories Baby Doll Acessories Baby Doll Sling Baby Shoes Back Warmer Pillow Backpack Bags Barbie Beading Beads Bedsheets Beret Bibs Bikini Blankets Blazer Bleached Blog Tour Blogs Blouse Bolero Book Covers Book Review Boots Bowling Game Boxers Boy Bracelet Bralette Breastfeeding Pillows Briefs Button Shirt Button Up Shirt Cap Cardigan Carnival Causes Cell Phone Stand Challenge Create Charger Support Chevron Christmas Clutch Coats Commitments Constant Change Contests cookies Corset Cose+ Costumes Cowl CraftingCon Crochet Crossstitching Cushions Dance Outfit dashiki Dia de Los Muertos Diaper Pouch Doll Clothes Dolls Drawstring Bags Dreamcatcher Dress Duvet Cover e-book E-Zine Review Easter Embroidery EnglishPaperPiecing Fabric Baskets Fabric Chess Game Fabric dolls Fabric Flowers Fabric Games Fabric Memory Games Fabric Printing Fabric Stash Fabric Three in a Row Game Fabric Toys Features Felt Flamenco Dress Flamenco pants Food Free PDF Pattern Fun Cakes Funny Fur Gifts Girl Giveaway Glasses Case Granny Squares Guest Posting Hair Clips Hair Clips Hanger Halloween Hand Warmer Pillows handbag Handmade Cards Harem Headband Henley Highlow Home Homemade Liquid Soap Hoodie How to Inspiration Jackets Japanese Sewing jeans Joggers Jumper KCW Keyring Kid's Choice Series Kid's Crafts Kimono Kleenex Purse Pouch knitting Knock it Off Leather lederhosen Leg Warmers Leggings lunchbag Maratón Telaria MashUp Series Maternity MeMadeMay; Men Mending Challenge Mini-Sofa Cover Mobile Mobile bag Mom's Monthly Wrap Up Needle Rolls Nightgown No Sew Nursery One Thimble Onesies Operation: Project 0$ Other Crafts Ottobre Overalls Pajamas Pants Paper Crafts Party Favours Party Time Patchwork Pattern Pattern Testing Pattern Tour Pear Puff Seat Pencil Case Pencil Rolls Peplum Peques de Cine Peter Pan Collar Pijamas Pillow Covers Pillows Piñata Cake Pinterest Challenge Pipe Cleaner Crafts Placket Pockets Plastic bags Dispenser Pleats Pocket Slings Podcast Pompoms Pouch Practising ´n Improving Project Run and Play Project Sewn Projects Pt Refashion Week Quilting Recipes Recycled Ribbon Organizer Recycling Refashion Month 2012 Refashion Month 2013 Refashion Month 2014 Refashion Month 2014 (2) Refashion Month 2015 Refashion Month 2016 Refashion Runway Refashioning Retro Reverse applique Reviews Ribbon Roses Robe Romper Romper Dress Romper Week Roots Round up Rucksack Saving Series Saving while Sewing Savings Made By Sewing Scarf ScrapsBusting Sequins Sew 20's Sew Along Sew Geeky Sew In Tune Sew-a-bration of Womanhood Sew-vivor Sewing Tips Shirt Shorts Skirt Skort Sleep Sack Slings Slippers Snowflakes & Lace Sock Monkey Socks Stitching Suit Surprise Sweater sweatshirt Swimsuit swimwear T-shirt The Hearties The Sew Off Thrift shopping Tights Tips Tissue Case Toddler Top Top 12 of 2012 Top 5 of 2013 Top 5 of 2014 TOP 5 of 2015 top 5 of 2017 Top Stitchers Trousers TSNEM Tunic Tutorial Tutu underpants Underwear Upcycling Vest Videos Vintage waistbag Wallet When things go wrong WIP Women Wreath Year Wrap Up

Cose +

Cose +
Magazine de Costura em Poruguês