2014-01-31

January Refashion Month with Maegen from Foster Ramblings

Maegen from Foster Ramblings is the guest who's closing the series this time. She's again a blogger I met through Project Run & Play and I've been following close. Back in December she had her second baby boy so I much appreciate that even though, she was able to write us a little tutorial and share some of her previous refashions for her eldest boy. Make sure to share some love to Maegen, she deserves it! 

...

Hi! I'm Maegen, and I blog over at Foster Ramblings. When I was little I drove my parents crazy because I kept everything. I would keep little trinkets and bits of this and that to create furniture, toys, pictures and other accoutrements for my dollhouse. Thankfully, I'm better now at distinguishing treasure from rubbish. But I can't think of a time when I couldn't look at something used and see potential. When I started sewing clothes for my little boy I knew there was a world of possibilities in old clothes.

Here's a picture of Mack in some pajamas I made. I took the old pajamas apart, used the pieces as a pattern and sewed new pajamas reusing the zipper. This was one of my first clothing refashions. 

Another favorite of mine is this shirt with a Harry Potter quote, made from a really awful pair of men's shorts.

This little outfit is when I truly fell in love with making clothes. I used a pair of my husband's wool dress pants that I accidentally shrunk in the wash to make the pants and vest in this ensemble.

Repurposed Nathan's practice jersey into a jersey for Mack.

Repurposed a top sheet into a hangout hoodie.

And this little pea coat from an old wool shirt takes the cake! 

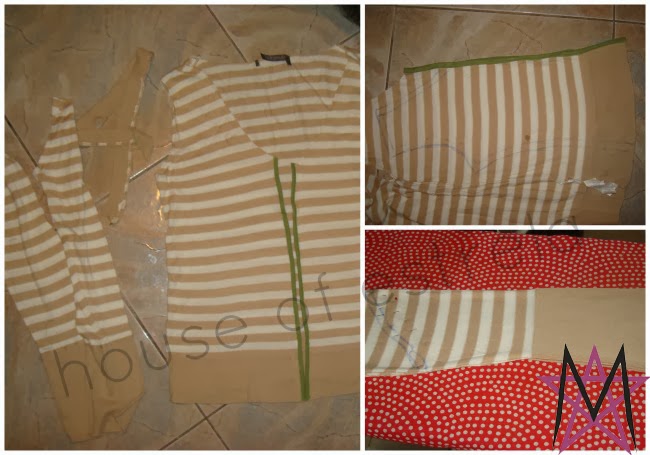
When Magda invited me to participate in her refashion month I was so excited! I grabbed the last slot available because I wasn't sure how much sewing time I would have after Baden arrived. I haven't had a ton of time to sew, but I whipped up a little tutorial.

Jeans make a wonderful resource for repurposing. I'm currently working on a pair of Small Fry Skinny Jeans made with a pair of my old jeans and some scrap fabric. I want to share the steps I used to make bows for the back pockets.

In addition to cutting out my pocket piece, I also cut a rectangle of my accent fabric. Mine was 5x2 inches, I eyeballed the measurement based on how much of the pocket I wanted covered.

Use a rolled hem foot to finish one edge of the accent piece. 

Pin your piece onto your pocket. The right side of your accent piece should be pinned to the wrong side of your pocket. I used a 1/2" seam allowance because that is what the pattern called for. 

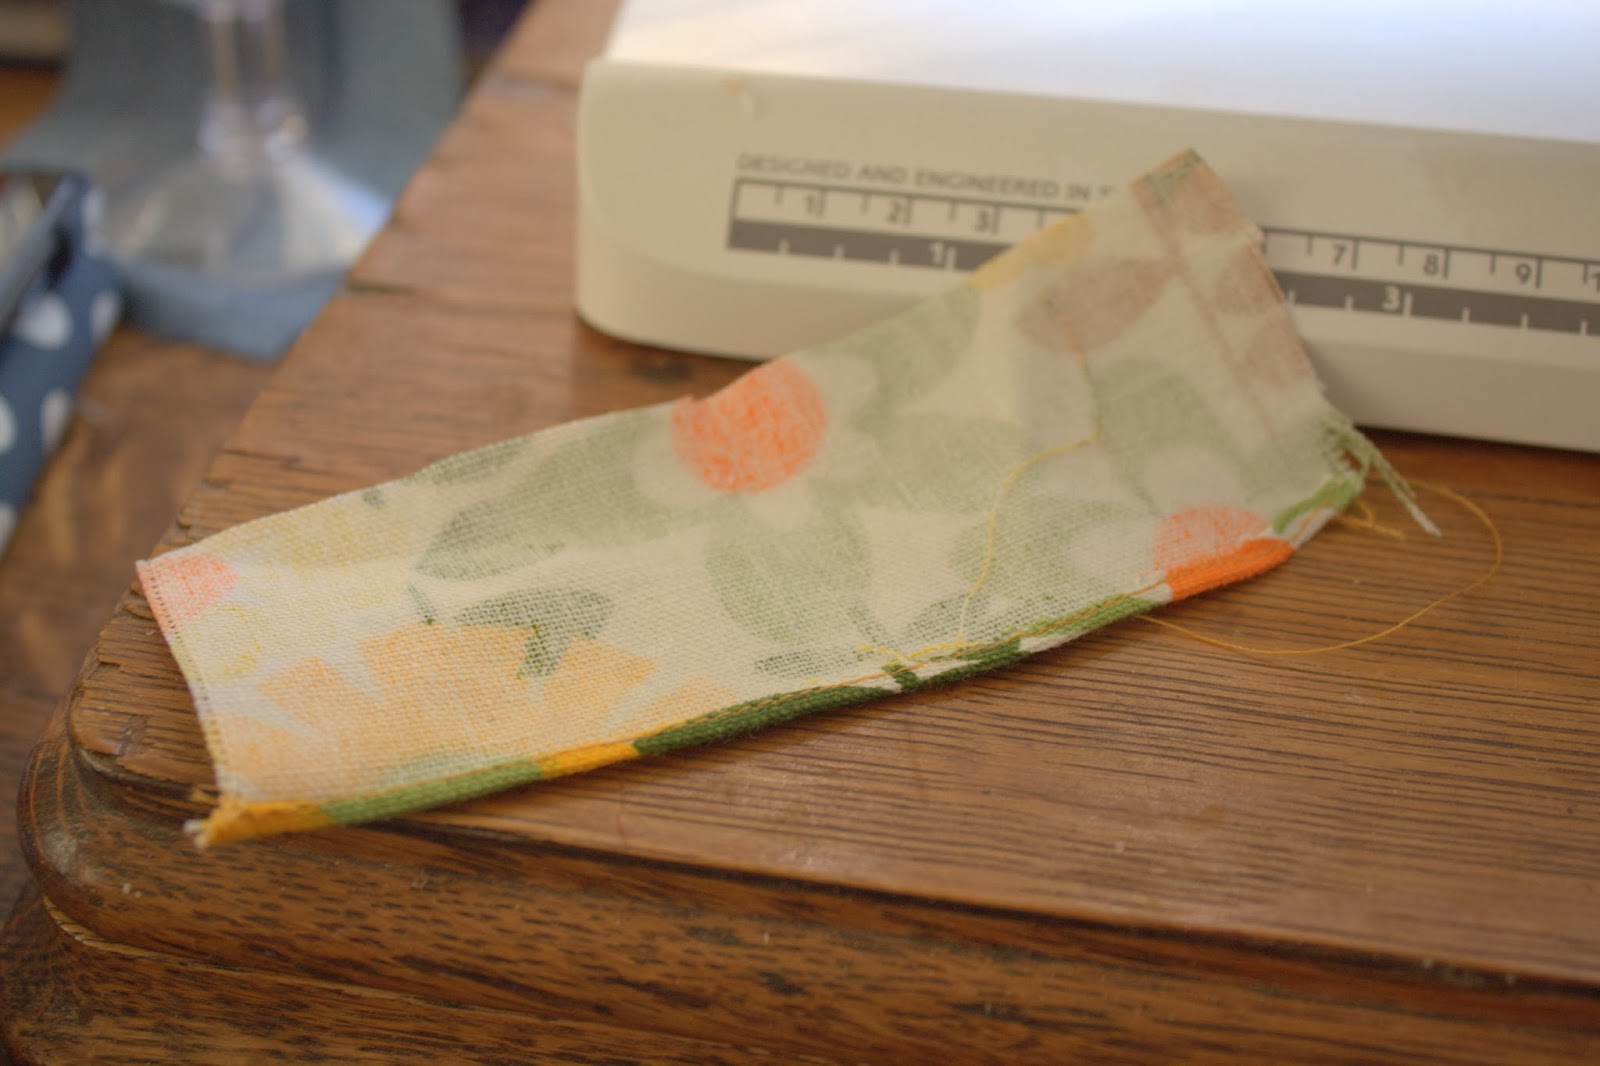
After sewing the accent piece onto your pocket piece, flip it to the front, press with an iron, and baste the sides. 

Cut out the pieces for the bows. I used a 3x3 square.

Fold in half and sew a tube with a small seam allowance.

Turn the tube right side out, tuck in the open ends and top stitch the whole way around your little rectangle.

Fold the center of your piece several times, kind of like an accordian.

Stitch in place.

Make another small tube. Sorry, I forgot to take pictures of mine. 
Wrap your tube around the center of your bow.

Pin your bow to your pocket.

Sew your bow onto your pocket. Make sure that your center piece has been sewn on well, and that the ends won't come up. Clip off any excess fabric.

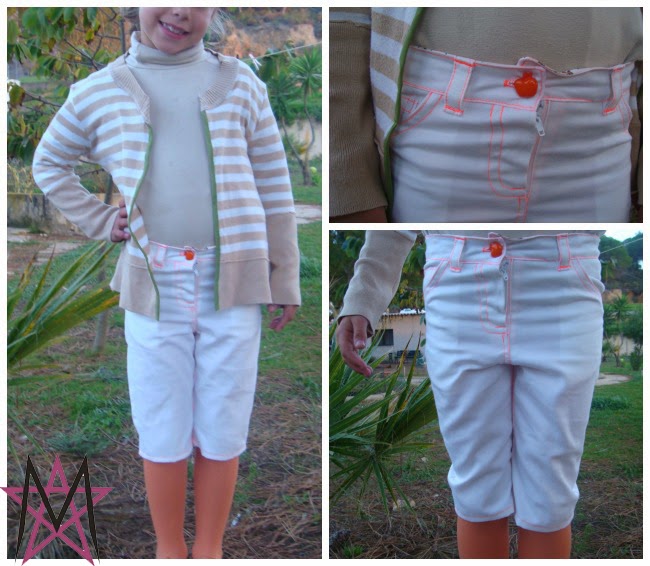
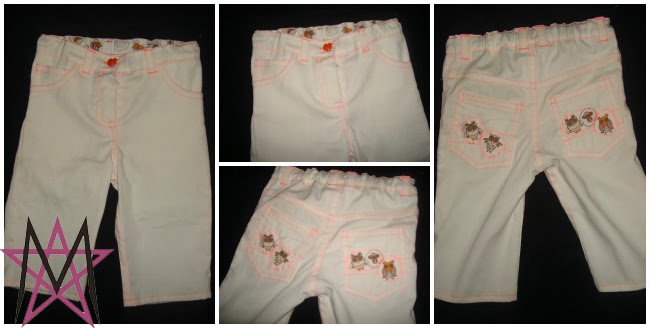
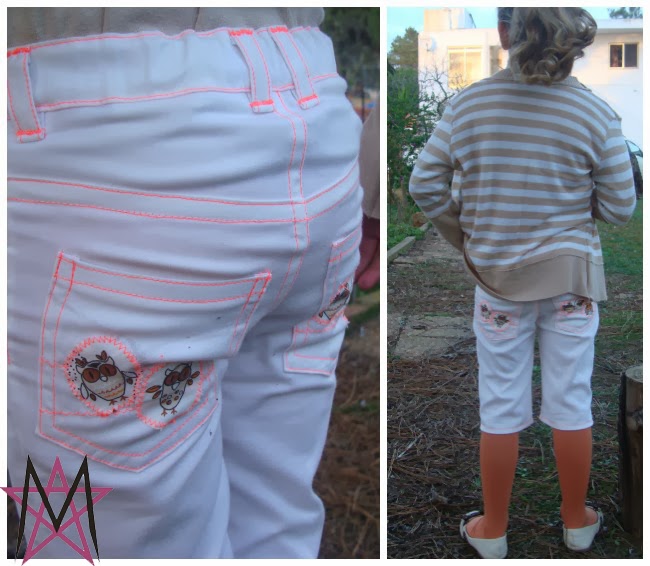
Add your cute back pockets to your favorite pants pattern!

Thank you so much for hosting such a fabulous series Magda! There have been some fabulous posts shared by so many wonderful blogging friends, and I'm glad I was able to be a part of it.

2014-01-30

January Refashion Month with Al from Shaffer Sisters

Today's Al's turn to post in the series. She is the youngest of the three Shaffer Sisters. As much as I love all the sister's, I have to admit that Al was the first I felt more connected with only because I was able to work closer with her, by the time she tested the Dreaming of Spring blazer for me. And that's the only advantage she has on her sisters. And just check how much refashioned inspiration she's sharing with us today!!!

...

I love Magda. She has become a very true friend even though geographically we are very far away from each other. I'm always so excited when I get the opportunity to work with her and I'm especially excited to be here today.

It seems that refashioning has become the necessity and preference when sewing for the kids and sometimes myself (unfortunately I don't do enough sewing for myself yet). Currently my husband is in school and I am a stay at home mom. Sewing is my sanity and the form of keeping my children clothed.

My Family (50% of what is worn in this picture is refashioned; my dress was made from a sheet, Ty's shirt was from a women's shirt, Ty's pants got flowers added to the bottom, and Ty's shoes were dirty white thrift store shoes that we cleaned and painted a nice mustard yellow)
So many times I've heard the excuse that sewing is expensive and not worth the effort. They tell me that fabric costs more than if you just went to buy the exact same item in the store. This could be true if you think that fabric only comes from a fabric store. Today I wanted to give you a few pointers on getting fabric cheap.

Clean Out Your Closet

Madame Principal Dress - Color Blocked Skirt - Katharine Hepburn Style
I've seen my sister Jo take her husband's old work shirts and make something for her kids or herself at least half a dozen times. Looking at the unwanted or unused items sitting in the closet are a great place to start (especially when sewing for kids because it doesn't more than an unwanted adult shirt to make them something great).

I had a cute navy polka dot dress that I had from high school that would never fit my post baby body, but I couldn't let go of. I used it for a stripes and polka dot challenge on PR&P to make Ty her Madame Principal Dress. She loved it more than any other clothing item she's ever had and wore it constantly until it got too small.

Go to a Thrift Store
Underwater Land Tee - Tangerine Poppy Dress - Perpetually Prepared Suit - Thank Goodness For Little Girls Dress
I find the fabric available at a fabric store unexciting and low on quality (especially when you consider the price). When you pick up something that is used, it's obvious how it washes (whether it will ball up or wrinkle) and you can get some pretty unique prints. The 'Thank Goodness for Little Girls Dress' was made from a vintage pillowcase we picked up at a fabric store.

Ty's 'Perpetually Prepared' suit (blazer and pencil skirt) was made from a women's T-length skirt. The blazer was made using an awesome free pattern from Magda called Dreaming of Spring. I've  been dying to make another one, but have been swept up in the craziness of life lately.

Check out the $1 Rack
(go to clothing stores as they're switching out old stuff for new seasons)

Surely Stylish Scarlet Top - Black Staple Dress
This is a pretty cheap and easy way to get knit fabric. I usually look for prints that I like or solids that would be versatile. The bigger the clothing article, the better (it means more fabric you can use).

Use a Sheet or something similar (you can get tons of fabric for cheap)
Surely Stylish Scarlet - Bold on a Budget Overalls - Cracker Jack Sailor Suits & Nautical Skirts - Singing in the Rain Skirt
This might be one of my favorite ways to get fabric. You can get so much fabric for so little money (especially when the sheets are on sale or you use a coupon). With one flat sheet (I'm pretty sure it was twin size) we were able to make 2 little boy Cracker Jack Sailor Suits and 2 little girl Nautical Skirts.

Make It Interesting
Bold on a Budget Overalls - Surely Stylish Scarlet - Underwater Land Tee
Once you have your desired fabric you will have to use the judgement call on whether you think your fabric and sewing design is enough to stand on it's own. Sometimes it's fun to freshen your look by using a contrasting thread or maybe some fabric paint. The possibilities are seriously endless.

With the Bold on a Budget Overalls, Jo used contrasting piping, contrasting thread, and contrasting fabric paint to give a really fun look. The Surely Stylish Scarlet outfit was made from a white sheet. To give it dimension, we used a rolled hem with red thread on the bottom of the ruffles. The Surely Stylish Scarlet top was made with color blocking fabric and then using the opposite colored fabric paint to put on the design.

Whatever your source of fabric, never let a small buget stand in your way of creating something beautiful.

With Love,
Al

PR&P S8 week 3: Upcycling

This is pretty much the same as signature week for me I believe. One of the main things that characterizes me when it comes to sewing is that like 80% of the times, the new pieces come from previous exciting ones. Of course it was obvious I would participate this week. Some would be expecting something more elaborated, like the jacket I made for week one, from the pair of pants. But nope, I went simplier this week. 


To start off, those were actually the first pieces I made for this season of PR&P. I started 2014 refashioning this shorts and cardigan. As I mentioned here, I was one of the lucky testers for the Small Fry Skinny Jeans pattern by Titchy Threads. I was assigned the girl's shorts version, size 5, inset pockets, zipper version and fully topstitched. Oh yeah, there are many choices to choose from. In the next pair I made - which is what I showed you first last week, I went with the boy's version shorts, size 8, patch pockets and all the rest the same as the first. 


Because you have to sew through so many layers, and because I had sewn the free 2T version of the same pattern, I knew it would be too much for my machine to sew through it all, so I was looking for a much lighter fabric instead of the stretchy jeans the pattern sugested me to. Because I couldn't find the needed fabric and still wanted to use something stetchy I went with what I had in my refashioning stash... a white women's pair of shorts. 

I took all the pieces apart and gor rid of the zipper (it wasn't possible to reuse it anymore), the original loops and the lining bag pockets. then I pressed the pieces of fabric I had left and tried to position the pattern pieces as best as I could to be able to reuse as much as that fabric. 

I had just enough, and by the end I was really pleased. To top stitch my shorts I used neon orange to stand in the white. I'm not really a neon fan, on the other hand, I tend to avoid it, but I thought the niece would like it and decided to try, after all I bought the neon thread sometime ago and didn't even know why. 


This is a do-it-over and over again pattern. The instructions are so clear and so easy to follow that it is impossible not to finish your piece without the professional look. Laura even includes an attachment to help you sew the girl's fly, just to make your life easier! 

The only problem I had, and it seems to be happening ONLY with my niece L. - again! - is that when I choose a pattern size according to her measurements, it always gives me a size smaller than her age. Exemple: she's 6 now and her measurements put her in a size 5, and that's what I did, but when we tried it on, turns out it fitted everywhere, but it was too tight in her hips. From now on, I will always make her a size up no matter what her measurements tell me. 

Anyway, to finish on the shorts, I used a owl printed fabric to make the inside waistband, and just to add something different I cut a few owls from the fabric and patched them into the back pockets. It turned to be a favourite for everyone around here.  I needed something for her to wear with the shorts and since I was running out of time to send my tester pictures, I had to make something quick, and that's when the cardigan enters the scene. 


A few years ago, this was one of my first attempts on refashioning - for me, I was still far from becoming a mother back then. I had been given a niece sweater, but I wanted to try to turn it into a cardigan. Well, I started, but had never finished. With time, it got stainned on the back and in the front with hair paint. I thought it was pretty much lost but was never able to just give it up to the garbage bin. And I was happy when I rescued it to resize it for my niece. 


All I did, was grab a shirt that would fit my niece L. and use it to cut two new front pieces, a back piece and two sleeves. I used the original button because I liked the hemming. Also I cut the collar away so I could reuse it again. Since I didn't need such a large piece for the new resized cardigan, I was able to cut the stained piece away and patch it together again. Then attached it back to the cardigan and voilá, it was done. 

And even though L. loved the shorts, she said this was her favourite piece because it wasn't as tight and uncomfortable to wear. Also, she said she liked to colour, so I'm glad I was able to salvage it from a hopeless end. 

2014-01-29

January Refashion Month with Scary from Shaffer Sister's

My guest today is the middle sister from the the Shaffer Sister's, Scary! Although being gifted with other talents (that runs in the family), she's the photographer among them, and if you're interested, you should check her tips for a no stress family photo here. She also did a great article in their blog about bullying, those subjects I mentioned they approched, and will rise awareness about the important things. Today,I'll leave you with Scary and what she prepared for us. Then again, if you haven't yet... go check their blog to lift up your spirit. 

...

I love Magda and her refashions are my favorite from around the web (obviously if you are here you already know how awesome she is). That respect for Magda made it really hard to decide if I wanted to share a new project or a wrap up of a few old ones so I decided to do a morph of the two.
I was chosen to test the Pippa Peplum from See Kate Sew and it was the perfect way to use an x-small junior sized top (the blue with black hearts) and the bottom of top came from XL men's shirt both of them I found at Walley World on their clearance for $1. They were waiting in the refashion tote for the perfect project. I just love how it looks on her.

One of my first refashioning projects that I did was before we started blogging was making a duvet cover into a dress for my niece, Ty, for her 1st birthday. It was a simple sundress that I used the a couple of rows of elastic thread to suck it in. That first time really planted a seed for refashioning and taught me to use what was on hand.
The next refashion was one that really taught me to think outside of the box. Taking my mom's 15ish year old sweatshirt to a maxi skirt for Ty.
http://shaffer-sisters.blogspot.com/2012/09/horse-sweatshirt-to-horse-sweatskirt.html
This was one of her favorite skirts because it was comfortable and the sweet horses on the front

When we lived in Idaho one of my friends showed us how to make sock leggings. Which really showed me that when you refashion take advantage of the work that has already been done. Sometimes that is in hems and other times that is just basic shapes flipped to work.

What to make your own sock leggings?

Even though I have been doing refashions along I really feel like the last 6 months, I have really hit my stride. I am finding myself more inspired by what I have on hand. This fall, Al and I were lucky to be able to go to a free swap event at my church and we went "fabric shopping".
Here are a few of the things that I have been able to make since from the items I acquired:
Hangout Hoodie Zip Flip was made using a ladies sweatshirt. It really took for me to do some out of the box thinking on getting the shape to work but both Boston and I have been so satisfied with the results.

The Fur Bolero and Cupcake Top Tunic the quality of fabric I used was so much better because I was refashioning far better than what I could have found or afforded at a fabric store.
And the boots I was able to refresh from Hand Me Down status
If you get a chance please stop by our blog, Shaffer Sisters to see what we will do next.

2014-01-28

January Refashion Month with Amy from Peek-a-Boo Pattern Shop

Again, I can't tell when I started following today's guest blog, she's well know, Amy from Peek-a-Boo Pattern Shop. It was a long long time ago, that I know because I remember her daughter was still so little, and after that came the little brother and now there's another baby almost here. Isn't that exciting? I believe babies push us into getting creative and inspire us. Right? Amy has created her latest line of patterns inspired in her new baby and I can tell you if you haven't seen it yet, you should, every single pattern is a must have. I'm honoured to have her sharing her refashion with us today. 

...

Hi I'm Amy from Peek-a-Boo Pattern Shop and I'm so excited to be here today! You can shop my full pattern line at Peek-a-Boo Pattern Shop and find lots of fun and free tutorials on the Blog. I absolutely love refashioning and giving old items a new life! Some of my favorite fabrics are cut-up thrift store tees. Last week I grabbed this fun sweater out of my sister's cast-off pile and downsized it for my mini me. You can find the tutorial for it today on my Blog. Sweater upcycle
Today I have a fun tutorial to share with you for the sweater headband I made with my leftover fabric. I used sweater fabric since that's what I had but this will work with any stretchy fabric. IMG_5697
Sweet and simple with just a bit of retro vibe :) IMG_5695
For my 4 year old I used a strip 12" long and 5" wide. If I had a bit more fabric I probably would've gone with 6" for the width. My fabric was super stretchy so I recommend wrapping the fabric around your child's head to make sure you get the right length. You'll also need one smaller piece for the "knot". With right sides together I sewed the long edges together for each piece to form a tube. IMG_5676
Then I sewed the short ends of the "knot" piece together to form a little loop. IMG_5677
Next slide the loop over the headband piece IMG_5679
Then tuck in the raw edges of the headband piece, slide one end inside the other and topstitch shut. IMG_5680
And that's it! Super quick and easy project perfect for using up scraps :) IMG_5681
Thanks for having me!

Labels

About us Acessories Adult Adults Advent Calendar Appliqué Baby Baby Acessories Baby Doll Acessories Baby Doll Sling Baby Shoes Back Warmer Pillow Backpack Bags Barbie Beading Beads Bedsheets Beret Bibs Bikini Blankets Blazer Bleached Blog Tour Blogs Blouse Bolero Book Covers Book Review Boots Bowling Game Boxers Boy Bracelet Bralette Breastfeeding Pillows Briefs Button Shirt Button Up Shirt Cap Cardigan Carnival Causes Cell Phone Stand Challenge Create Charger Support Chevron Christmas Clutch Coats Commitments Constant Change Contests cookies Corset Cose+ Costumes Cowl CraftingCon Crochet Crossstitching Cushions Dance Outfit dashiki Dia de Los Muertos Diaper Pouch Doll Clothes Dolls Drawstring Bags Dreamcatcher Dress Duvet Cover e-book E-Zine Review Easter Embroidery EnglishPaperPiecing Fabric Baskets Fabric Chess Game Fabric dolls Fabric Flowers Fabric Games Fabric Memory Games Fabric Printing Fabric Stash Fabric Three in a Row Game Fabric Toys Features Felt Flamenco Dress Flamenco pants Food Free PDF Pattern Fun Cakes Funny Fur Gifts Girl Giveaway Glasses Case Granny Squares Guest Posting Hair Clips Hair Clips Hanger Halloween Hand Warmer Pillows handbag Handmade Cards Harem Headband Henley Highlow Home Homemade Liquid Soap Hoodie How to Inspiration Jackets Japanese Sewing jeans Joggers Jumper KCW Keyring Kid's Choice Series Kid's Crafts Kimono Kleenex Purse Pouch knitting Knock it Off Leather lederhosen Leg Warmers Leggings lunchbag Maratón Telaria MashUp Series Maternity MeMadeMay; Men Mending Challenge Mini-Sofa Cover Mobile Mobile bag Mom's Monthly Wrap Up Needle Rolls Nightgown No Sew Nursery One Thimble Onesies Operation: Project 0$ Other Crafts Ottobre Overalls Pajamas Pants Paper Crafts Party Favours Party Time Patchwork Pattern Pattern Testing Pattern Tour Pear Puff Seat Pencil Case Pencil Rolls Peplum Peques de Cine Peter Pan Collar Pijamas Pillow Covers Pillows Piñata Cake Pinterest Challenge Pipe Cleaner Crafts Placket Pockets Plastic bags Dispenser Pleats Pocket Slings Podcast Pompoms Pouch Practising ´n Improving Project Run and Play Project Sewn Projects Pt Refashion Week Quilting Recipes Recycled Ribbon Organizer Recycling Refashion Month 2012 Refashion Month 2013 Refashion Month 2014 Refashion Month 2014 (2) Refashion Month 2015 Refashion Month 2016 Refashion Runway Refashioning Retro Reverse applique Reviews Ribbon Roses Robe Romper Romper Dress Romper Week Roots Round up Rucksack Saving Series Saving while Sewing Savings Made By Sewing Scarf ScrapsBusting Sequins Sew 20's Sew Along Sew Geeky Sew In Tune Sew-a-bration of Womanhood Sew-vivor Sewing Tips Shirt Shorts Skirt Skort Sleep Sack Slings Slippers Snowflakes & Lace Sock Monkey Socks Stitching Suit Surprise Sweater sweatshirt Swimsuit swimwear T-shirt The Hearties The Sew Off Thrift shopping Tights Tips Tissue Case Toddler Top Top 12 of 2012 Top 5 of 2013 Top 5 of 2014 TOP 5 of 2015 top 5 of 2017 Top Stitchers Trousers TSNEM Tunic Tutorial Tutu underpants Underwear Upcycling Vest Videos Vintage waistbag Wallet When things go wrong WIP Women Wreath Year Wrap Up

Cose +

Cose +
Magazine de Costura em Poruguês