2012-12-19

A Simple refashion: Tights to Socks

A few weeks ago we were given a lot (about 20) pairs of winter tights for G., to join the more than 20 already existing around here that fit. But a few from these didn't fit anymore. That's okay, I thought, she has too many already (I might select some and donate soon), but I was really sad about a particular one. It was grey with little red hearts on it. Just like a shirt she has. What a perfect match it'd be. 

But again, they didn't fit. 

I first sadly put them in the doesn't-fit-anymore-pile, but I could see them often where they were, and it was like they were screaming to me. They wanted to stay with us, you know?!
So, of course I had to think about how to keep it and how to make something useful out of it. The most reasonable thing to do was to turn them into a pair of high socks, and eventually, that's what I did. 
And it was so easy! 

2012-12-18

Christmas Cards

Every year I forget to send my cards soon enough to all the people I'd like to. This year though, I want to be on time, I think I still am. I made cards to some special people and I just sent them today. Yes, I repeat! I made the cards... hahaha...
Have a look:
So, what do you think? 

2012-12-15

Baby Leg Warmers and a little extra

Please excuse the mess behind us and the fact that I still was wearing my pajamas ;)
I just realised that there's a few things handmade in this photo, when in fact I only wanted to picture one. hehehe
That thing I was hoping to take the shoot to was the adorable leg warmers baby G. is wearing. They were made by my mother. This is the second pair, she actually made a pink/salmon pair before, but G. hasn't used them yet, and this one is by far much cuter. Mom had made two pairs before for my nice. She's a quick knitter. The same can't be said about me. I could only stitch one way, and it was straight, I never knew how to start, and easily forget how to end something. Not to say I would take months to actually finish anything i'd knit. 
Though a few weeks ago, I asked mom to  p l e a s e  teach me again (!), I wanted to make G. a scarf. And I have learnt how to start it on my own. Mom tried to thaught me but I was being a very slow learner and she quit. =( Shame one me. But then, I decided I was going to pull it through, and after a single try I made it. I finally understood how to make it. 

Only a couple of weeks after, the scarft was done. what?! But baby G. won't let me put it on her. Not even to take a single picture =( So I had no choice but to use a bear as a model. At the edges of the scarf I attached two pompoms. I didn't make a pompom in years, and I made them amazingly fast. Hurray for me!
My next goal is to make her a bonnet... f e a r  i t! 
I actually finished another knitting project right before I started the scarf, but it still needs a little button touch and then I will share it. 

Now let's get back to the beggining of this post. Let me just point out the other handmade stuff showing on the photos above. 
First thing is the hair clip hanger baby G. is holding on her hands. It was a blank canvas I turned into a clip hanger, and it matched the decor in her room. It is made of the same fabric I used for her curtains, bed cover, pillow, and crib protectors. 
Second thing is the sock monkey I have showed you here
Third thing, is the clip with the red flower on it. I made it a while ago, way before she was born. 

2012-12-01

Christmas Ornament Tradition

Last year was my daughter's first Christmas. Back then I decided every year I would add something handmade to our tree. Which is a small one, the same I had for a few years before her. No plans on buying a bigger one so soon. 
For now, I am the one making the handmade something, but I hope next year she'll be joining me on this task, I want to share this magic with her. 
Last year I used a fabric angel I had made a couple of years before, it's on top of our tree (this year too), so, instead of making something new last year, I didn't, I just used something I had done before. That's not fair, right? So, to compansate it, on a sleepless night I cut and sew a pair of trees. I used blue felt on the front, where I stitched a few stars on each, and on the back I used a beautiful cotton red fabric, shame I didn't take any picture of the back. 
When I filled it, I added a few drops of my favourite essential oil, so, besides being an ornament, it leaves a wonderful smell when we enter the room where our tree is. 

2012-11-27

Knock it off Girl Dress

Over at Elegance & Elephants blog, Heidi is hosting a Knock it Off Series. Where mom designers have been creating amazing looks, inspired by existing (and most of the times too expensive) pieces. I've been following it and loving and recently, I was just going through some picture albums, trying to organize all I have saved through the last couple of years, and I came across a picture.
This image was given to me by a costumer, she wanted me to make a dress like that one for her daughter's first birthday. I did try my best, especially because she didn't live close enought to come and try it on, so I just had to hope it'd fit well.
I couldn't help but to immediately think about making my own Knock it Off post. It's fun!
My costumer didn't like the light tone of pink, so I made it darker, which I personaly like better too. Besides, instead of making a white diapper cover with pink ruffles, I made a pink one with white ruffles. I soooo love mine better. I guess I didn't do that bad. The strips were too long, and the girl's mommy tried to fix them a little, bit they were still falling off. That's the bad part of this dress.

Here's how I originally made them, before she got it and fix the strips. I even thought about making a dress like this one for my little one too, but just using a different colour - I'm not a huge fan of pink! But I had so much to do at the time (4 dresses for my cousin's wedding, G.'s birthday dress, Flamenco outfits...) that I didn't. Maybe if we get to have a party or something to go I might think of that.

2012-11-22

My first Sock Monkeys

I've been working on a charity project lately. Someone has asked their readers (portuguese blog, that's why I'm not sharing here) to make sock and glove dolls to share in some pediatric hospitals. I never made such dolls, though I would like to try sometime. I joined the cause. I started by making one only. But my precious little girl thought it was pretty cool to hang around all day, so I had no choice but to give it to her.
I made two more sock monkeys to make up for this one she kept.

Here's the tutorial I followed.

So, I bought new pairs of socks and started them. Here's how they ended up like:
And she was trying to make these two her own as well, she played around with them for a little, before they were finished and then allowed me to give the final touches. 
Aren't they so cute? And I'm very proud of my three first sock monkeys! Do you like them?

2012-11-15

Baby Shoes

I tried a little refashion/recycling lately. My niece has a 5 months old (tomorrow actually!) baby girl, and I haven't been doing much for her. I guess I get stucked on doing things for my own little girl, and kinda forget about anything else. So, as I was saying, I tried a little refashion, I got a pair of V.'s damaged jeans and cut a piece from one of the legs to create a new pair of baby shes. These are not the first pair of baby shoes I make, but they are the first ones I make using this pattern. 
Here they are:
I would make some changes in this pattern if I'll use it again. I wasn't really pleased with it, but it worked anyway. I'll give them to the little one today... let's hope her mommy likes them. 

2012-11-02

When Things go Wrong 2

I already finished the sailor inspired pants a couple of days ago, but still need to get some pictures taken. G. is actually wearing them today. I love to see her on these. But it's raining a lot outside, and it's dark inside, so pictures of it must wait for a better day. 

Since I hate waste and want to keep using clothes from my huge pile of clothes to refashion, I wanted to make her a matching vest. But I wanted to make a lined vest. I thought I knew how to make one. I did make vests before, but I suddenly had a black out. It went wrong and I had to come online, trying to figure out what was I doing wrong. 

I got it now! This tutorial has helped a lot! So, hopefully I will get it done by the end of the day. 

2012-10-26

Tutorial: Sailor Inspired Button Pants

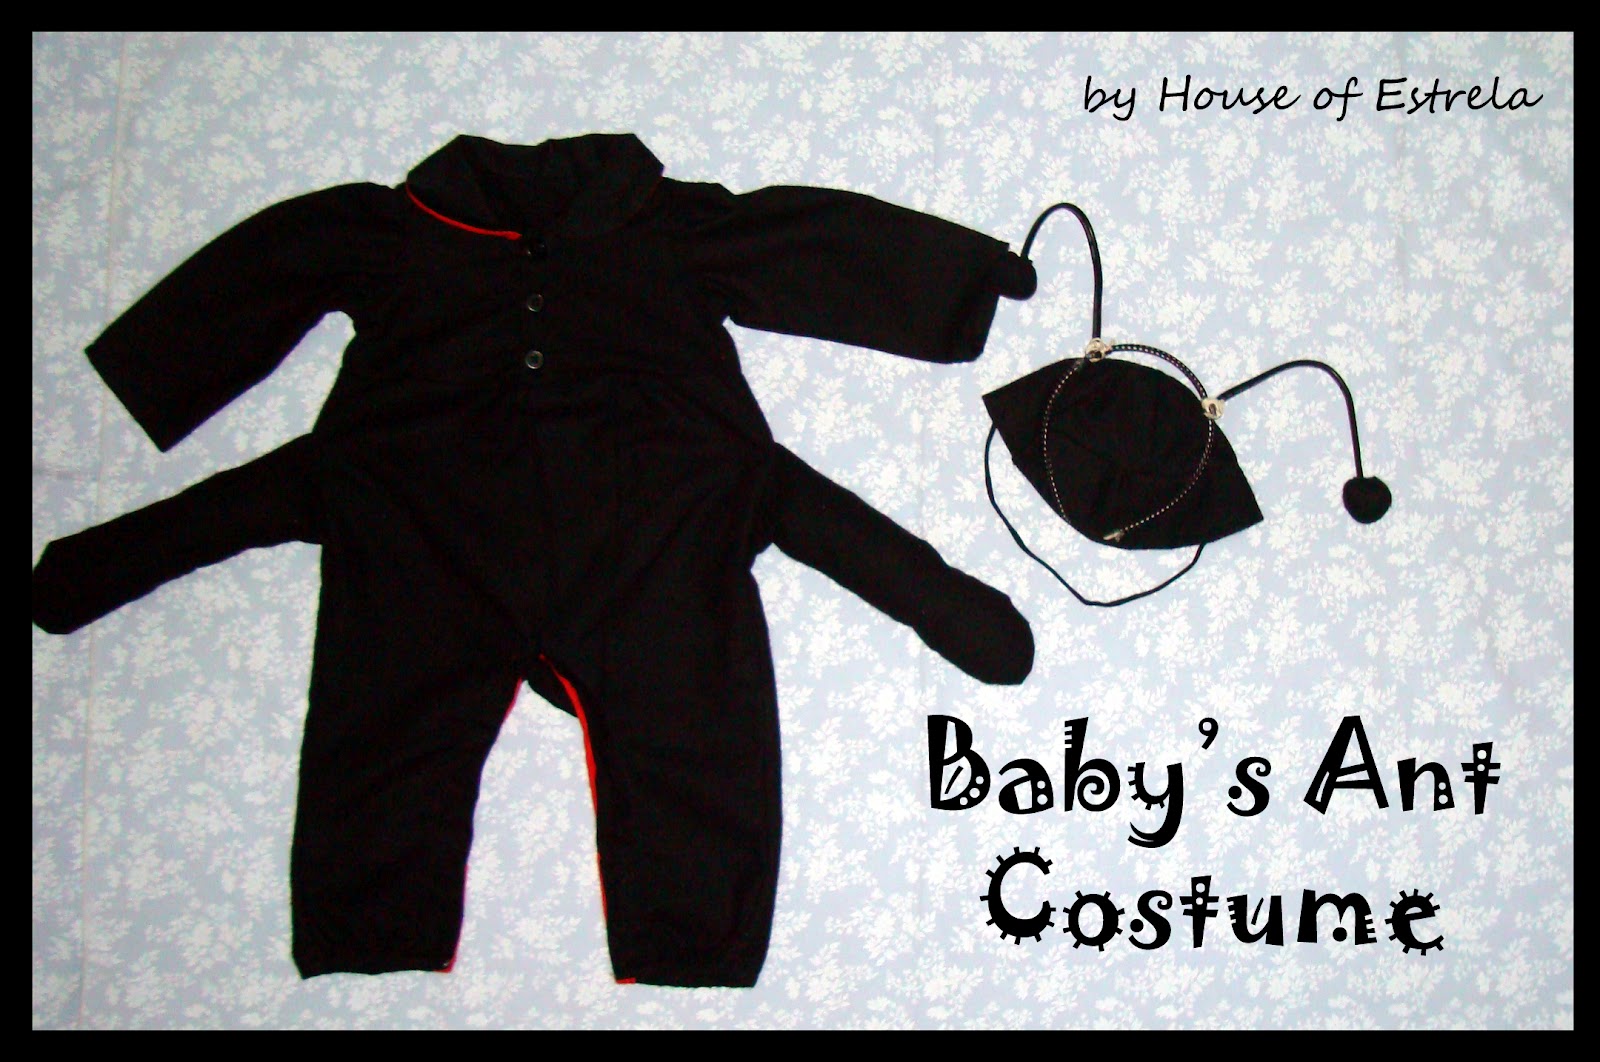
Here's something I never did before. Not until I decided I would make it this time. 
I will tell you the whole story, yes, don't worry. I had this green pants I bought for myself last year, but only wore it once, so, I wanted to make them into something else for baby G. I knew what kind of piece I wanted to make (pants), but I didn't want them to be ordinary. I wanted something different, but couldn't really think of anything that would please me 100%. 
I will surely show you the before and after of the pants refashion, but today I have been working on a new tutorial.. so let me get to this first. 
I made up my mind about what type of pants to make when visiting my sister's I saw these pair from my 5 year old niece. 
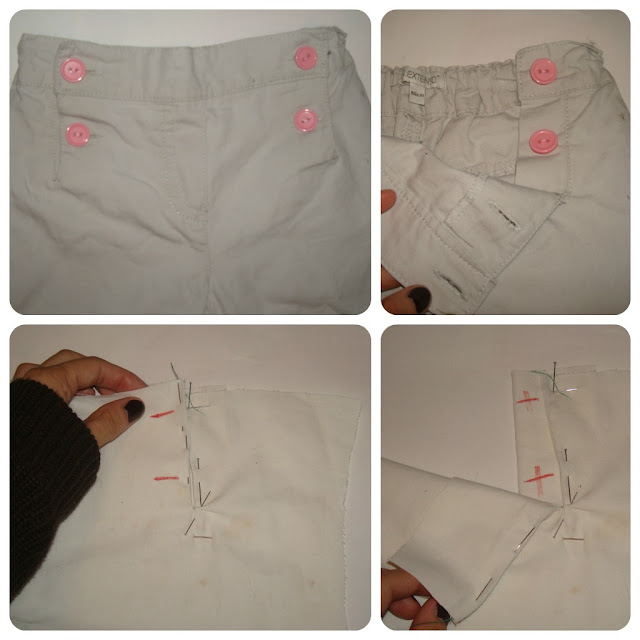
Top: original pants from my niece; Down: my experimenting
I liked it so much I brough them with me so I could copy the pattern. I had to figure out how to make the sailor like closure, that's something I had never done before and wasn't sure how it'd be done. So, there I was staring at it, over and over, until I finally grabbed a piece of scrap fabric I use for experiments and tested if my thoughts on how to make it, were any right. They were, so it was time to make it on the final fabric, with no fear of messing it all up. 
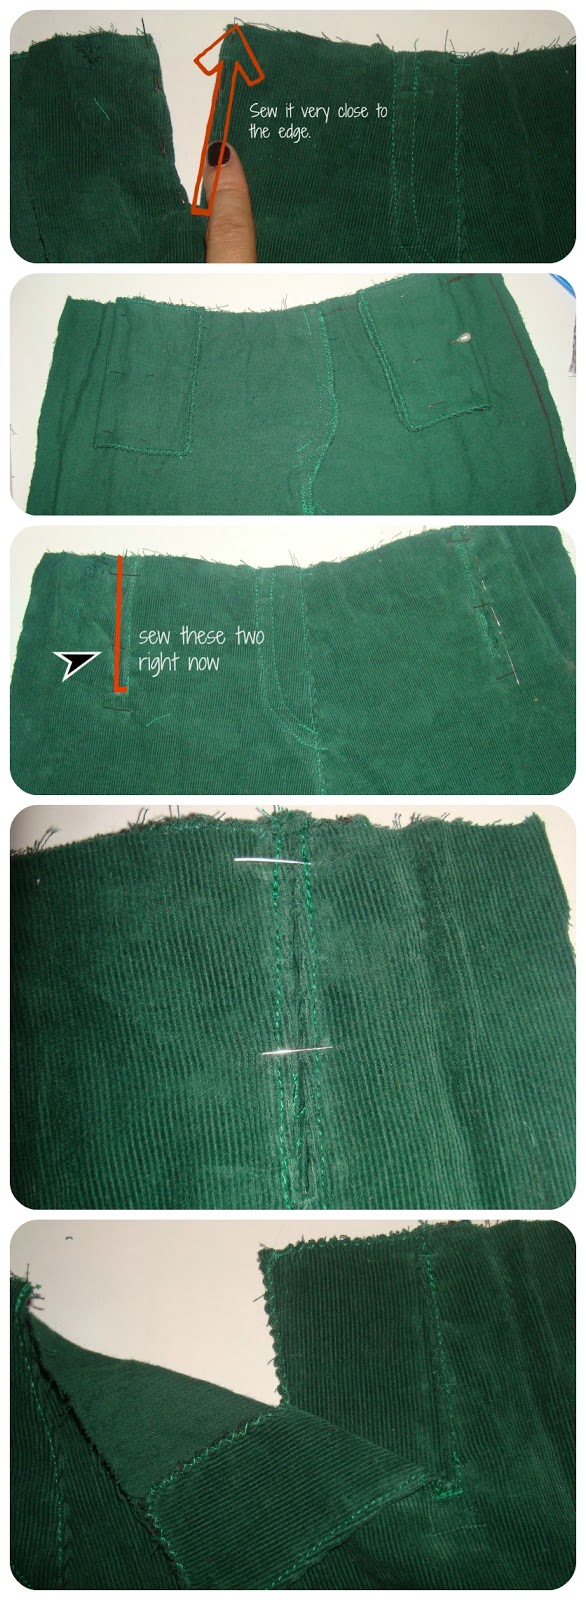
First thing you have to do is mark the place where the opening will be on the front piece of the pants. From that mark, measure 4cm into the centre of the pants front. Pin it. Then cut a 12x10cm rectangle, and put in on top of the front piece, right sides together. Make sure, one of the edges is right where you've pinned before (4 cm away from the opening mark). 
Turn it around, we're going to work on the wrong side of the front piece now. Sew a line on both sides of the one you've drawn on the fabric to mark the opening. See images above to understand it better, I'm not sure I am making myself clear. The porpuse is to cut in the middle of those two lines you're going to sew. 
Now, don't be afraid! You can cut your openings. Then turn it around, and pin it. See above images: front and back view, how they both will look like. 
Then, you will sew only one side of the opening. In the front side of the fabric. That will be the side I have marked on the picture below, for the left side, and the oposite on the other. After you do that, get to the back of the fabric again, and fold the rectangle to match the edges (see second picture below). Pin it in place (closing your opening this way). Then you will sew the other seam just like on the 3rd image below. 
On the last two pictures above you can see how it will look after you sew it. Closed and opened. Now the only thing left to do it make button holes and add buttons to it. 

Use your button to mark the correct lenght for your button hole. Draw the button holes on the front of the fabric. Make sure they are symmetric. Sew it on your machine. Add the buttons (I did it by hand), and you're done. 

I really screwed up my pants on one thing. Go back to the start of my post. Look at the original pants. Did you guess what I mean?! There are only two buttons on each side, and one of them is ON the waist band, which I haven't added to my pair yet. What can I do to fix it now? Use three buttons on each side. Easy! The problem? I only had 4 of these buttons. I will have to find another ones, that I have 6 of... =/ Next time I should pay more attention. 

There you go, here's what I've been working on all evening. I hope it's clear and useful. 

2012-10-17

Winter Love Flowers Outfit

October is going by and still without a single post in here... Shame on me!!!
Truth is I haven't been sewing as much as I'd like to, still I did finish a very cute project I had on hands: G.'s new Winter outfit:

So, let me tell you all about it. 
Baby G. has this so-very-cute t-shirt that I just love-love-love, and one of these days I was staring at it and feeling sad that one day it won't fit her anymore, and that day would be pretty soon, she grows fast. 
So, I took that original t-shirt and draft my own pattern. I had to consider that the fabric was much heavier and I would have to make it bigger. So, just copying it wouldn't be enough. 
Original piece (by Zara): Butterfly shaped sleeves detail. Front. Back. 

It was a hell of a hard work but I made it. I had to make some adjustments but it turned out better then expected. 
The tunic. Front, Back and Pocket detail. 
I loved how it turned out. Did I mention that before?! Adding the rounded pocket wasn't planned but I had fabric left and wanted to add something different, somthing me to it, so the pocket it was!

But after the tunic was done, I wasn't happy enough. I still had lots of this brown fabric left but very little of the one I used as bias and decorations. I wanted to make something out of the brown fabric still, and my mother was to one to suggest: make her a matching pair of pants. 
Pants front. 

Firstly I doubted it. I thought the fabric would itch, but mom was right... it's a heavy fabric, to wear on very cold days, so she'll probably be wearing it with a pair of collants underneath, so, why not? 
Pants back and pocket detail (her name's initials)

A new pair of pants it is. 
Perfectly sewn inside and outside. Just like I like it. 

Not that she would need it, she's been given lots of clothes, but mommy here just lovessssssss to sew for her, what can I do? And besides, there's way too many fabric on my pile right now. I have to start using them all... which I've been trying for almost a year. lol. 


2012-09-30

What's a lady without her bag?

So before September ends, I should share a few things I did while it lasted. 
I made a new bag. I decreased a pattern I had used a few times before to make this one smaller. I also made it with two small handles. 

 The previous one I meant, was this one:
Covered in lace, bigger than the one before, closes with a clip. No inside pocket like the smaller one. One only bigger handle. This one was made like 2 years ago actually, and I never used it. 

I also made two small clutches, using a free pattern online (click here). Here they are:
I loved them so much! I want to make a few more, I have a few ideas to make some original ones. 

Yesterday I finished a new tunic for little G., and today a new bag organiser, but that will be shared later!!! 
October is coming, that's my month, so let's enjoy it!!!

2012-09-26

It Smells Like Christmas Already


Yes it does. And it feels good. 

A few weeks ago, I FINALLY finished my Tilda Santa Claus. I started it about a year ago now. I wanted it for my last Chritmas, but it wasn't possible to finish on time and then I just kep postponing. I would look at it and think: it's still a few months to Christmas, and there's this or that to do first. And it went like this for almost a year.
But it's September. It is that time of the year when I start thinking about Christmas and making deco items and gifts for my dearest ones. Somehow I am even more enthusiastic about creating seasonal items than I had been before, so here's a bit more of my finished Santa:

I can consider this a little refashion too, because I used an old red corset (I had made long ago) for the Tilda's clothes. And yes, I did cut a corset to make a doll's clothes if you're wondering. I didn't wear it for years because it's ziper broke... And I just new I wouldn't be fixing it so soon. 


2012-09-16

Playboy inspired onesie

Painting ain't really my thing!
But I had some fabric paint, my mom has left here from when she painted G.'s birthday banner. and I had a friend coming to my town, with her lovely boy. She's actually an e-friend and it was the first time my family met hers.
I wanted to make something for the boy but let's admit I am not really good at coming up with boy gift ideas. They made it easier for me though, they are both tattoo artists and I knew they like hardcore things for little D.
So, using my mom's fabric paint and using my drawing skills, I made him this playboy themed onesie:
I'm planning to make a few more versions of onesies, but I have no clue when... as always...

From Consume Tendencies

Image origin

It hit me just a few seconds ago, so before I change my mind, I'm about to make a new commitment to myself, and I am making it public so I keep up with it. 
A get a lot of clothes FOR FREE, some I like, some I don't... some I donate and some I get to turn into something new when the fabric is lovely. 
SO, why on earth, do I have the need to buy any new clothes?! Seriously, there's a shopping center right by my house, and every now and then I go there with baby G. I always bring something home with me... either for myself or for her. 
And I'm saying enough now. With my sewing skills and my free clothes I have enough to get myself new clothes at any time. 
My commitment consists in buying NO more clothes (for me or G.) until the end of the year. I'll only make an exception if the item is really needed and not only wanted

Labels

About us Acessories Adult Adults Advent Calendar Appliqué Baby Baby Acessories Baby Doll Acessories Baby Doll Sling Baby Shoes Back Warmer Pillow Backpack Bags Barbie Beading Beads Bedsheets Beret Bibs Bikini Blankets Blazer Bleached Blog Tour Blogs Blouse Bolero Book Covers Book Review Boots Bowling Game Boxers Boy Bracelet Bralette Breastfeeding Pillows Briefs Button Shirt Button Up Shirt Cap Cardigan Carnival Causes Cell Phone Stand Challenge Create Charger Support Chevron Christmas Clutch Coats Commitments Constant Change Contests cookies Corset Cose+ Costumes Cowl CraftingCon Crochet Crossstitching Cushions Dance Outfit dashiki Dia de Los Muertos Diaper Pouch Doll Clothes Dolls Drawstring Bags Dreamcatcher Dress Duvet Cover e-book E-Zine Review Easter Embroidery EnglishPaperPiecing Fabric Baskets Fabric Chess Game Fabric dolls Fabric Flowers Fabric Games Fabric Memory Games Fabric Printing Fabric Stash Fabric Three in a Row Game Fabric Toys Features Felt Flamenco Dress Flamenco pants Food Free PDF Pattern Fun Cakes Funny Fur Gifts Girl Giveaway Glasses Case Granny Squares Guest Posting Hair Clips Hair Clips Hanger Halloween Hand Warmer Pillows handbag Handmade Cards Harem Headband Henley Highlow Home Homemade Liquid Soap Hoodie How to Inspiration Jackets Japanese Sewing jeans Joggers Jumper KCW Keyring Kid's Choice Series Kid's Crafts Kimono Kleenex Purse Pouch knitting Knock it Off Leather lederhosen Leg Warmers Leggings lunchbag Maratón Telaria MashUp Series Maternity MeMadeMay; Men Mending Challenge Mini-Sofa Cover Mobile Mobile bag Mom's Monthly Wrap Up Needle Rolls Nightgown No Sew Nursery One Thimble Onesies Operation: Project 0$ Other Crafts Ottobre Overalls Pajamas Pants Paper Crafts Party Favours Party Time Patchwork Pattern Pattern Testing Pattern Tour Pear Puff Seat Pencil Case Pencil Rolls Peplum Peques de Cine Peter Pan Collar Pijamas Pillow Covers Pillows Piñata Cake Pinterest Challenge Pipe Cleaner Crafts Placket Pockets Plastic bags Dispenser Pleats Pocket Slings Podcast Pompoms Pouch Practising ´n Improving Project Run and Play Project Sewn Projects Pt Refashion Week Quilting Recipes Recycled Ribbon Organizer Recycling Refashion Month 2012 Refashion Month 2013 Refashion Month 2014 Refashion Month 2014 (2) Refashion Month 2015 Refashion Month 2016 Refashion Runway Refashioning Retro Reverse applique Reviews Ribbon Roses Robe Romper Romper Dress Romper Week Roots Round up Rucksack Saving Series Saving while Sewing Savings Made By Sewing Scarf ScrapsBusting Sequins Sew 20's Sew Along Sew Geeky Sew In Tune Sew-a-bration of Womanhood Sew-vivor Sewing Tips Shirt Shorts Skirt Skort Sleep Sack Slings Slippers Snowflakes & Lace Sock Monkey Socks Stitching Suit Surprise Sweater sweatshirt Swimsuit swimwear T-shirt The Hearties The Sew Off Thrift shopping Tights Tips Tissue Case Toddler Top Top 12 of 2012 Top 5 of 2013 Top 5 of 2014 TOP 5 of 2015 top 5 of 2017 Top Stitchers Trousers TSNEM Tunic Tutorial Tutu underpants Underwear Upcycling Vest Videos Vintage waistbag Wallet When things go wrong WIP Women Wreath Year Wrap Up

Cose +

Cose +
Magazine de Costura em Poruguês